4.3.1 Victor SPX
What is a Victor SPX?
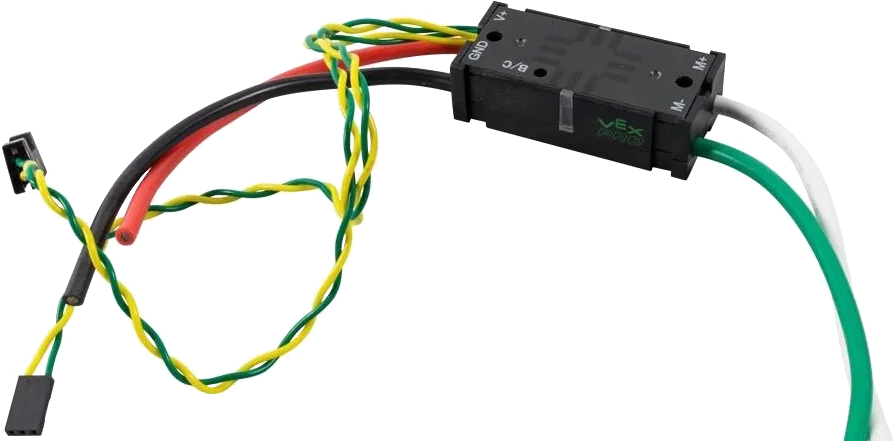 Image from: WPIlib Excerpt
To quote one of the developing companies:
The Victor SPX was co-developed through a collaborative partnership between VEX Robotics and Cross the Road Electronics and is 10% smaller and 25% lighter than the Victor SP, making it the smallest and lightest motor controller in FIRST Robotics Competition history.
That bit about the smallest motor controller might still be true, but really what sets the Victor SPX apart is the price. It is the cheapest CAN capable BRUSHED motor controller at the time of writing this. Why is it cheaper than the Talon SRX? Cross the Road Electronics made a handy guide that was available here hosted by FRC 358!
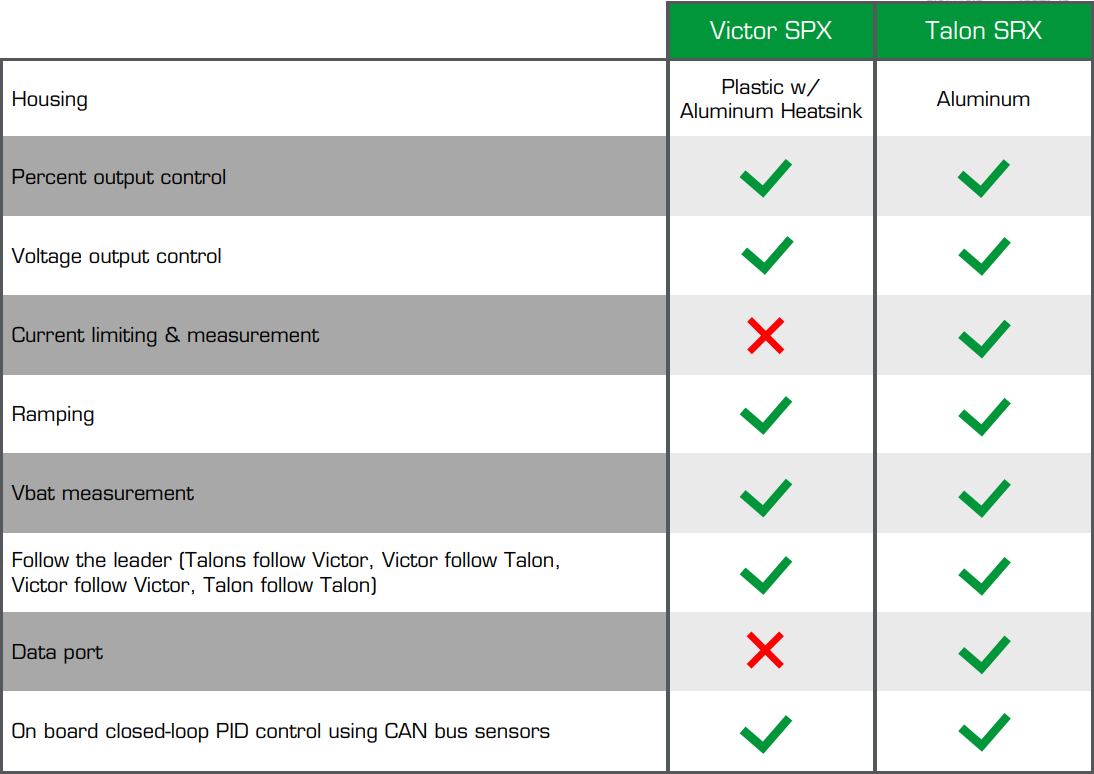
If you don’t need a data port or current limiting, the Victor SPX is a great choice for your robot.
The full specs from CTRE are below:
| Kit Contents | (1) Victor SPX Motor Controller Power, Ground, Output, PWM/CAN cables come pre-attached |
| Outputs | Powers brushed DC motors with variable speed forward, reverse, or off. Can NOT be used with Brushless motors. |
| Material Type | Plastic w/Aluminum Heatsink |
| Communication Protocols | PWM, CAN (1 Mbps) |
| Dimensions | 2.5" x 1.16" x 0.77" (63.5mm x 29.4mm x 19.5mm) |
| Weight | 0.12 lb [54.4g] (without wires) |
| Nominal Voltage | 12V |
| Min/Max Voltage | 6-16V |
| Continuous Current | 60A |
| Surge Current (2 sec) | 100A |
| PWM Input Pulse (high time) | 1 - 2 ms nominal |
| PWM Input Rate (period) | 2.9 - 100 ms |
| PWM Output Chop Rate (Switching Frequency) | 15 kHz |
| Minimum Throttle (Deadband) | Adjustable 0.1% - 25% (Default 4%) |
| P/N | 17-868388 |
How do I use a Victor SPX?
Depending on your control mode (PWM or CAN), the wiring will differ.
CAN:
- Connect the CAN data lines into the CAN chain, or if there is no CAN chain, connect one set of the CAN data lines to the CAN port on the RoboRIO.
- Connect the other end of CAN lines to the PDP or PDH.
- Connect the power and ground lines to the PDP or PDH.
- These are the RED and BLACK wires.
- Connect the motor to the Victor SPX.
- The Victor SPX has a 2 wire motor connection
- These are labeled as M+ and M- on the Victor SPX
- If you flip the wires on this side, the motor will spin in the opposite direction but not damage the Victor SPX or motor
- Update the firmware and assign an ID to the Victor SPX.
- This is done through the Phoenix Tuner software
- The Victor SPX will be listed as a “Victor SPX” in the software
- The Victor SPX will have a default ID of 0
- A full guide for updating the firmware and assigning an ID can be found here
- Run and Write testing code (again from WPILib)
-
  package frc.robot;

  import com.ctre.phoenix.motorcontrol.ControlMode;
  import com.ctre.phoenix.motorcontrol.can.VictorSPX;

  import edu.wpi.first.wpilibj.Joystick;
  import edu.wpi.first.wpilibj.TimedRobot;

  public class Robot extends TimedRobot {
      VictorSPX _victor0 = new VictorSPX(0); // Change '0' to match device ID in Tuner.
      Joystick _joystick = new Joystick(0);

      Override
      public void teleopPeriodic() {
          double stick = _joystick.getRawAxis(1);
          _victor0.set(ControlMode.PercentOutput, stick);
      }
  }
-
PWM:
- Connect the PWM signal wire to the PWM port on the RoboRIO.
- Connect the power and ground lines to the PDP or PDH.
- These are the RED and BLACK wires.
- Connect the motor to the Victor SPX.
- The Victor SPX has a 2 wire motor connection
- These are labeled as M+ and M- on the Victor SPX
- If you flip the wires on this side, the motor will spin in the opposite direction but not damage the Victor SPX or motor
- Run and Write testing code
-
  package frc.robot;

  import edu.wpi.first.wpilibj.Joystick;
  import edu.wpi.first.wpilibj.TimedRobot;

  public class Robot extends TimedRobot {
      VictorSPX _victor0 = new VictorSPX(0); // Change '0' to match device PWM port on the RoboRIO.

      Override
      public void teleopPeriodic() {
          double stick = _joystick.getRawAxis(1);
          _victor0.set(stick);
      }
  }
-