4.7.4 Falcon 500 Fixes
What is a Falcon 500?
The Falcon 500 is a motor and motor controller combination unit. It is a brushless motor with an integrated motor controller. The motor controller is a Talon FX motor controller. The motor is a brushless motor.
Leaving aside any “Availability, Ethical (IFI Issues), Etc” The new Falcon v3s for the 2023 season have been noted to have a few issues. This page is a collection of fixes for those issues and to cover the basics of troubleshooting the Falcon 500 in the v1 and v2 variants as well.
Before you start, do you have your Falcon Fixing Kit?
The Falcon Fixing Kit is a collection of tools and parts that you will need to fix the v1/v2 Falcon 500s. A B.O.M. for the v3 will be produced as soon as we get some… The kit includes the following items:
- Medium Strength Loctite (Loctite 243)
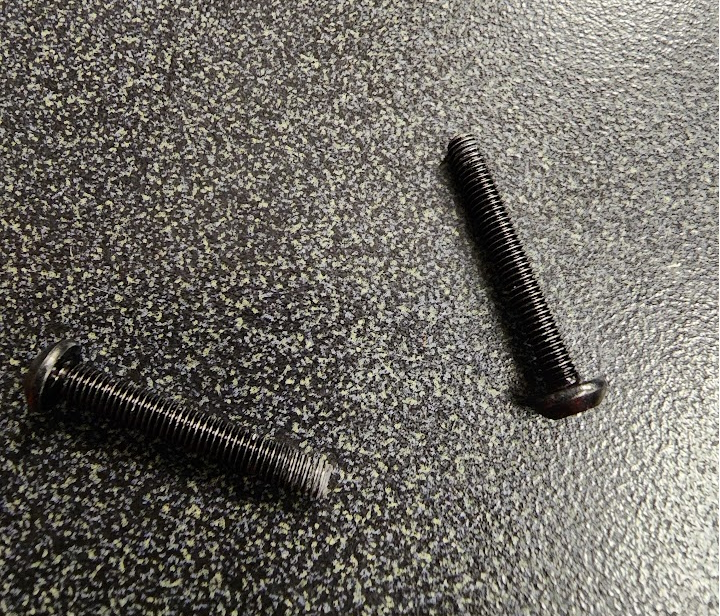
- New screws for motor housings since the torx heads strip easily:
- Shaft shims
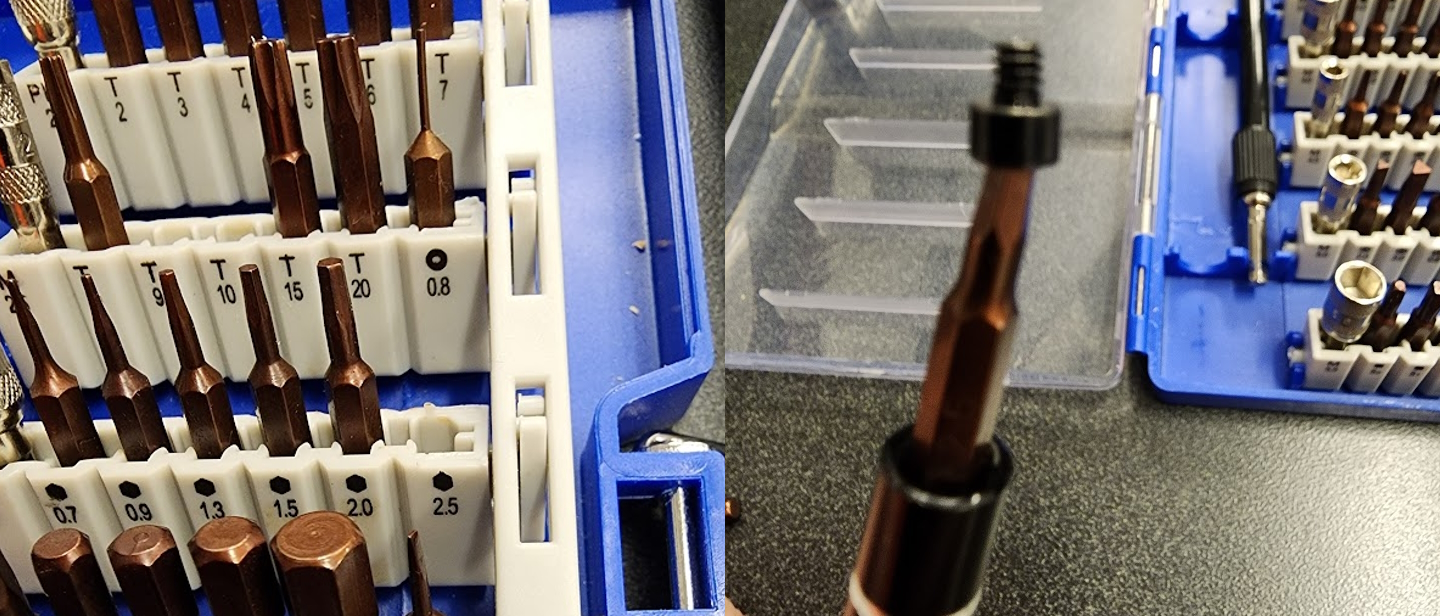
- Hardened T10 Driver for case screws
- Extended Hardened T8 bit for shaft screws
Additional Notes from Chief Delphi User who came up with the B.O.M. above:
I would also highly recommend you keep a bolt extractor set with left-handed drill bits and thread extractors. I had to use those on more than one occasion because the T10 case screws are soft and strip easily, or came out completely bent a few times after I fought them for an hour (hence the replacement screws above). We kept this set of tools and parts in the Falcon Un****** box and used it to QC verify (and fix) every one of the 32+ Falcon’s that passed through our shop last year.BOM Maker’s story from fixing them during the 2022 season
Contents for this Section
| Order | Section Title |
|---|---|
| 1. | Wobbly Shaft |
| 2. | Broken Bolts |
| 3. | Missing Loctite |
| 4. | Overheating |
| 5. | Size Changes and Documentation Confusion |
| 6. | Falcon 500 V1 Teardown |
| 7. | Falcon 500 V2 Teardown |
| 8. | Falcon 500 V3 Teardown |
| 9. | Other Fixes |
Wobbly Shaft
Teams who have bought Falcon v3 motors for the 2023 season have been reporting wobbly shafts. This is a result of the shaft tolerances being off and way out of the usual expected specs. It’s all a possible consequence of removing the shaft bolts(cuz they were loose cuz of missing loctite) It’s certainly not all motors, but teams ABSOLUTELY should check any v3 falcon 500s for this issue. Reddit Post identifying the issue
Fixes for the wobbly shaft
- 3d print a spacer to help keep the shaft on place. This can be the same falcon 500 spacers, but oversized by roughly 2mm. This came from the same reddit post, but has not been confirmed for a long term fix.
- Submit a RMA to VEX/CTRE/WCP for a replacement motor. This is a problem however as there are no parts for spares, vendors are out of stock for the remainder of the 2023 season https://www.vexrobotics.com/217-6515.html and if there are ones for RMA reserved, they will be subject to the same issue. This is a problem that will need to be addressed by the vendors.
- Don’t use a v3 Falcon 500 unless you dont have any other options. This is absolutely a really subpar option, but if you have no other options, you have no other options.
Broken Bolts
Teams who have bought Falcon 500s of all variants have been reporting broken bolts. This is a result of the bolts being too soft and stripping out or snapping. This is a problem that has been around for a while, but has been exacerbated by the new v3 falcons. These include longer screws that are too long in some cases and they were over tightened.
Fixes for the broken bolts
- Replace the bolts with stronger ones. This is a good option, but it is not ideal as Teams paying $220 for a motor should not have to replace the bolts. This is a problem that will need to be addressed by the vendors.
- If you break a bolt, you can use a bolt extractor to remove the broken bolt. This is a good option, but can lead to damaging the threads if not done correctly.
- A guide on how to do this can be found here
- Many teams will not be in a situation that they would need to be removing bolts except for the other issues listed here. If you are in this situation, and you need to remove bolts you should seriously consider the risks involved and the potential damage to the motor.
Missing Loctite
Teams who have bought Falcon 500s of all variants have been reporting missing loctite. This seems like not a big deal, except the bolts are crucial to the performance of the motor and its overall safety. This is a problem that has been around for a while, but has been fixed/exacerbated by the new v3 falcons. The rush to get the v3 falcons out the door while trying to avoid this has led partially to the wobbly shaft, and this is something seemingly to have been overlooked as a consqeuence of trying to fix it on the v1 and v2s in the past. Without the loctite, the bolts can come loose and cause the motor to fail during a match or practice.
Fixes for the missing loctite
- Replace the bolts with stronger ones. This is a good option, because more than likely you will strip/snap a bolt trying to QA inspect your bolts for loctite. This is a problem that will need to be addressed by the vendors.
- While I would normally recommend not taking apart a motor, this is a situation where you should take apart the motor and inspect the bolts. If you find a bolt without loctite, you should replace it with a stronger bolt as with all of the bolts and you should add loctite to the bolts. Use the 243 as listed in the BOM above.
Overheating
The Falcon 500 motors are High-Performance motors, and as such, they are designed to be able to handle a lot of power. However, they are not designed to be able to handle a lot of power for a long period of time. The motors are designed to be able to handle a lot of power for a short period of time, and then they need to be allowed to cool down. This is a problem that has been around for a while, but has possibly been improved by the v3. The jury is still out on this one. The motors feature air cooling ports that can be attached to your pneumatics system. A guide for this is here under the section called “Using the Falcon 500 Cooling Port”. Many teams who are not familiar with this, or don’t see the benefit of it, will not use it. This is a problem that will lead to burnt out and overheated motors.
Fixes for the overheating
- Use the cooling ports. This is a good option and is what the port is literally made for.
- Monitor the motors temperature. This is a good option, and it can help you know when you should let air in the ports to conserve air and the motor. This requires some extra work, but the Phoenix Motor controllers using the IMotorController interface have a method called getTemperature() that can be used to get the temperature of the motor. This reports the data in celsius… but whatever. Java API Doc
- Don’t use the cooling ports. This is a bad option, but if you don’t have the time to monitor the temperature, or you don’t have working pnuematics on the bot you can just not use them. This is a problem that will lead to burnt out and overheated motors. This is done at the risk of the Team choosing to not use the port. Rather silly if you ask me.
Size Changes and Documentation Confusion
Something that caught many people off guard is the new larger size of the v3 vs the v1/v2 models. The v3 size is correct in the cad model, but the website for the Falcon 500 only has a v2 2D drawing. While most teams would instinctively use the updated 3D model, some teams may grab the 2D v2 in a rush and not notice the size difference until its time to assemble it all. This would mean redesigning things in a hurry or having to use the v2/v1s that are smaller. This is a problem that will need to be addressed by the vendors and they need to update the website to reflect the correct size of the v3.
Fixes for the size changes and documentation confusion
- Use the v3 3D model. This is a good option, and is the correct option. If you are not using a v3 then this is not an issue for you.
Falcon 500 V1 Teardown
We have a teardown of the Falcon 500 V1 motor. This is a
Falcon 500 V2 Teardown
We have a teardown of the Falcon 500 V2 motor. This is a
Falcon 500 V3 Teardown
The pictures and account you see here is in no way fictional. This is a real account of a real person who has a real Falcon 500 V3 motor. This was verified by Mr. Siefen who runs FRC Zero and wrote the following guide. He took the pictures, stripped the screws, opened the stuff you shouldn’t ever open. He did this so you don’t have to. If you follow this guide WE (FRC Zero) and HE (ME, Mr. Siefen) are not responsible. This is purely for informational purposes, unintentional comedic relief during a stressful build season moment, and to show you what can happen and possible fixes.
Steps and Comments
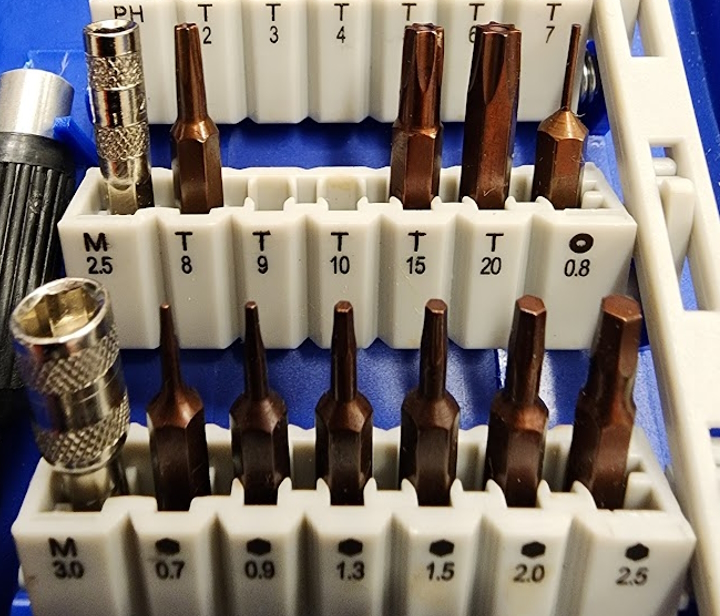
- Remove the case screws from the front of the motor.
- These are T9 torx screws. There are 3 per end of the motor. These are shorter than the ones on the V1/V2 and hopefully help with the bending/snapping of the previous ones.

- These are T9 torx screws. There are 3 per end of the motor. These are shorter than the ones on the V1/V2 and hopefully help with the bending/snapping of the previous ones.
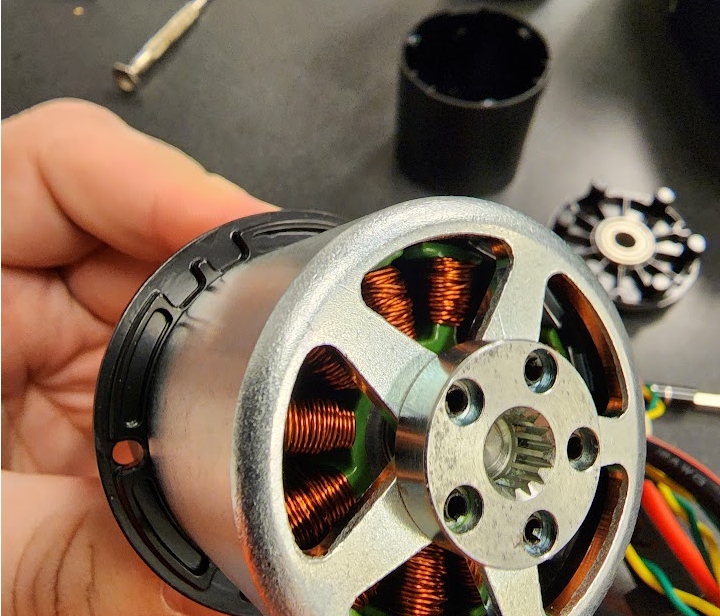
- The front plate and shaft will come off after the removal of the previous screws.
- The shaft has a toothed end of the spline shaft that is inserted into a matching insert on the rotor.
- If you notice this is already massively different from the previous versions.
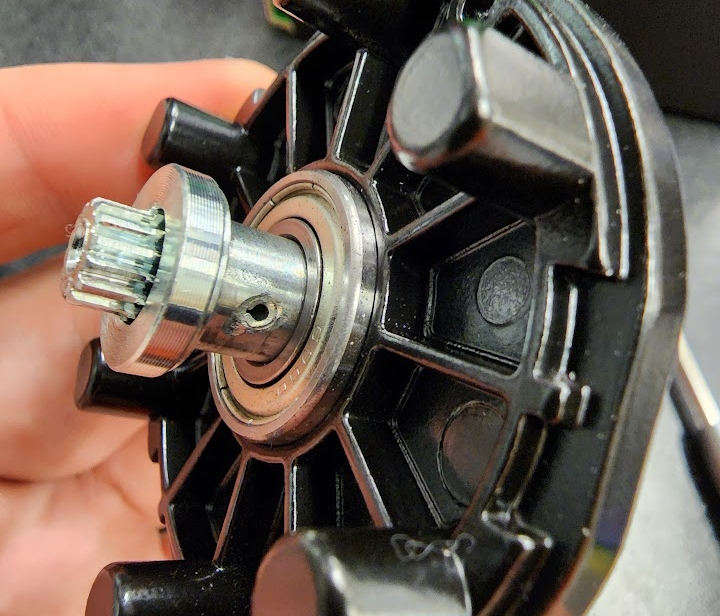
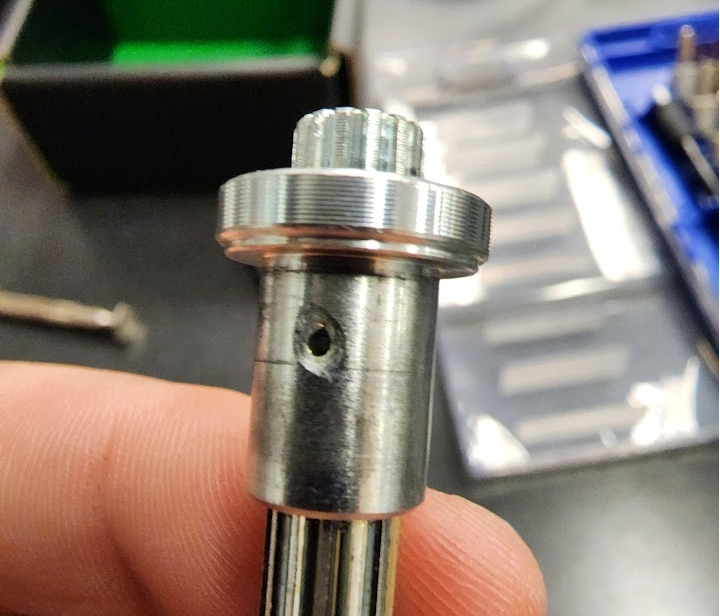
- You can separate the shaft spline from the front plate by pulling it out through the back.
- If you examine the shaft you’ll see how the large end is one piece that was done on a lathe and then it’s placed over the spline shaft
- It’s then joined with a pin and ground down to keep it locked in place.
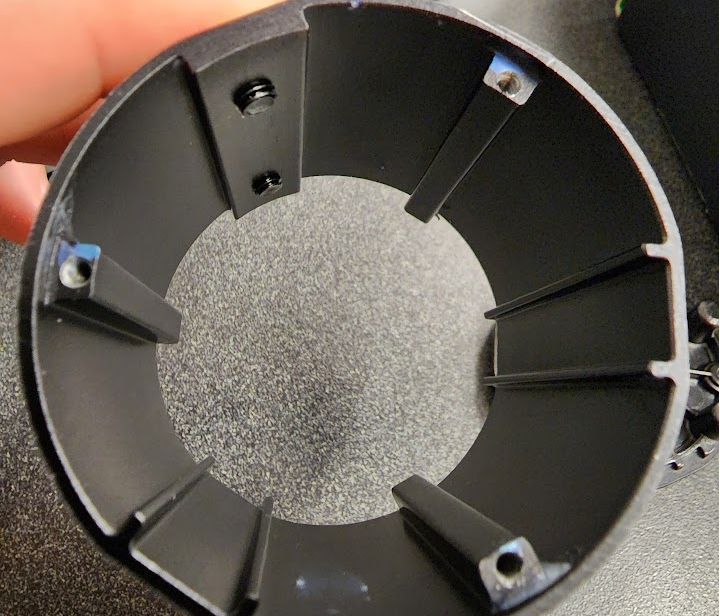
- Before removing the back case screws look at the insides where the front screws were attached
- The posts look a little beat up, I was very gentle and the new shorter bolts only have a small amount of grab.
- You may want to get longer screws (idk if this is possible yet) if you are planning on face mounting the falcon V3
- Also notice how much clearance you have from the air cooling ports to the rotor.
- If you plan to use either air cooling port you should not over extend your fittings. There’s about a fly’s eyelash worth of gap before you’ll be hitting the rotor and unintentionally braking the motor Flintstones style.
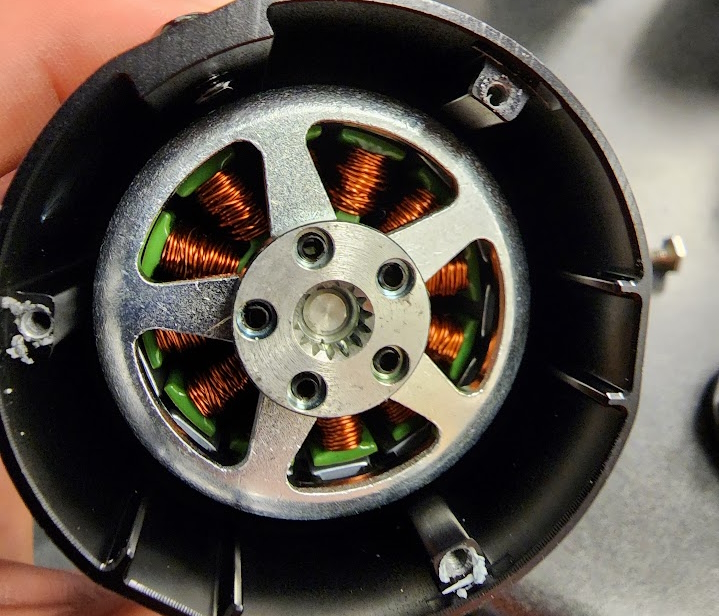
- If you plan to use either air cooling port you should not over extend your fittings. There’s about a fly’s eyelash worth of gap before you’ll be hitting the rotor and unintentionally braking the motor Flintstones style.
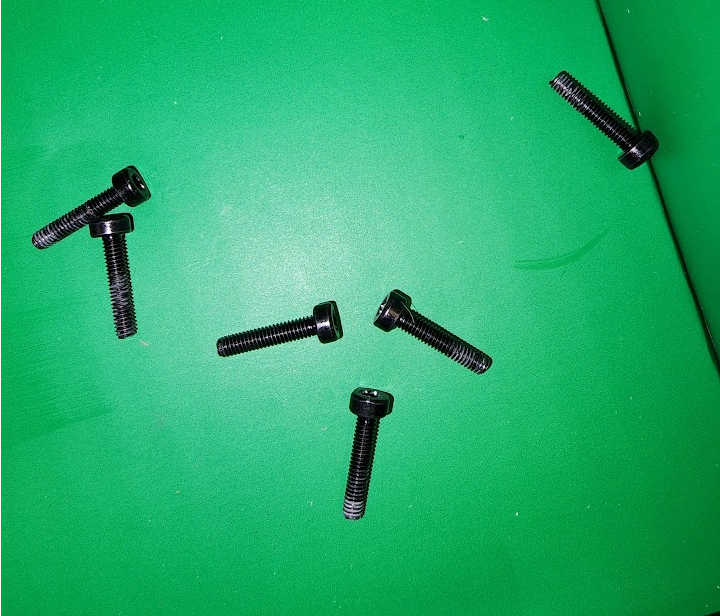
- These are the screws from both the front and back casing. They are the same so you don’t have to worry about mixing these up. However these are the only T9 sized torx screws on the falcon.
- If you didn’t already you can now remove the back casing screws. Do this gently since it’s the same soft grade metal as before and can strip out.
- Again this is still an improvement over the long case bolts that would snap/bend inside the casing. We lost 3 falcons this way our first year with them.
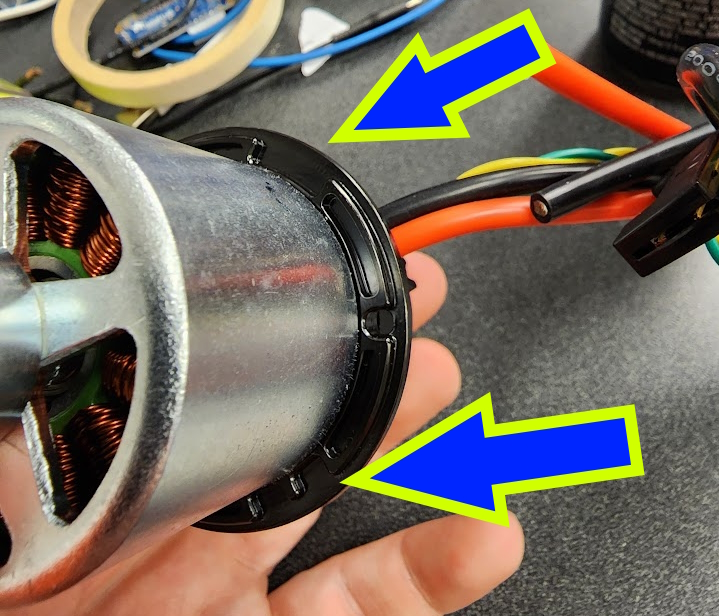
- When you take these off the case can slide off. Don’t worry right now about remembering how it goes back.
- There are 3 slots on the front and back plates to align it properly for assembly.
- Funny how the back side of the casing has loctite but the front posts had 0 sign of this… grrrrrrrr
- This is as far as you would ever need to disassemble the front half of a Falcon. Anything past this is beyond your control from this side.
- Idk why you would ever need to get the rotor apart and I have no clue how you would do that.
- Idk why you would ever need to get the rotor apart and I have no clue how you would do that.
- Look at the back side on the motors cap. There are 2 bolt heads and sizes here. Both are for the talonFX technically.
- The two screws around the FX cap are protecting a data port. They don’t need to be removed unless you plan to use the port.
- I do this later on
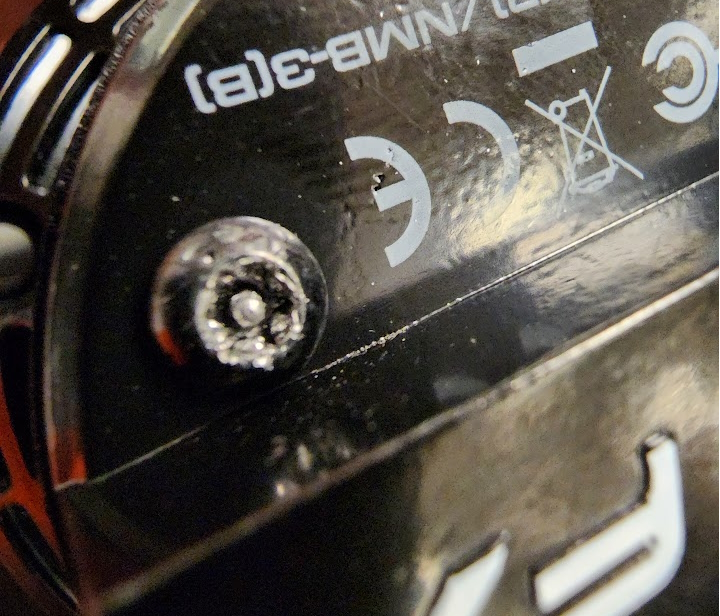
- The three T10 security screws suckkkkkkkkk
- We stripped one of the three out. We were gentle and I don’t see why a team should be doing this so proceed ahead at your own peril…
- We stripped one of the three out. We were gentle and I don’t see why a team should be doing this so proceed ahead at your own peril…
- The two screws around the FX cap are protecting a data port. They don’t need to be removed unless you plan to use the port.
- These are two of the three T10 security head screws for the talonFX.
- These screws keep the cap, hall encoder and motor controller PCB all aligned. Taking this apart can mess this up!
- There’s no sign of loctite here unless my colorblindness has messed me up again here.
- So why did I take it apart anyways? Science? No. You’ll see why soon.
- First off, this screw started to strip before I even starting trying to apply any pressure at all. As someone on reddit said
- “Really wish people would stop using security screw heads on products only engineers and mechanics will use”
- We know the security risks inherit and we need to be able to service these $220 motors when they were not properly QCd by the vendor
- Moving on to the data port screws while I calm down from the stripped screw…
- This is a 2.5 Allen! No torx needed for once, but now we’ve introduced a third tool and bolt size on this thing. So make sure to have all 3 sizes handy.
- These screws are so small. They will get lost if you even sneeze while doing this step. At comp they will be gone in an instant. Do not lose them as they are also not a size you can get at the local store. You will be forced to try and cut a longer bolt and file it down to this stub by hand and blood and tears
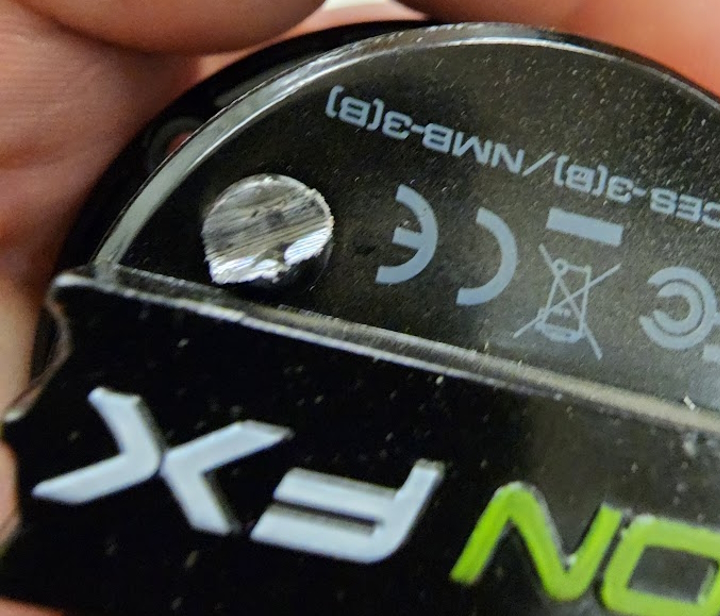
- Back to the stripped T10. It has now been transformed into a flathead as our screw remover was removed from the robotics lab by ghosts or a pack of raiders.
- If you are like us and don’t have a screw extractor, you can try to make a slot on the head with a Dremel. This is something we have practiced a lot
- No you can’t ask why we practice this.
- If you try to do this method be careful to not cut too deep and damage the motor. If you cut too far or wobble while cutting you’ll take off too much of the bolts head and the flat head will not work.
- If you are like us and don’t have a screw extractor, you can try to make a slot on the head with a Dremel. This is something we have practiced a lot
- So then I got the cap off.
- Remember how I said earlier I had a good reason for removing the cap? When I took this motor out of the box and shook it I heard a rattle.
- At first I expected this to be the wobbly shaft, but it was fine luckily.
- Then as I did the tear down I expected to find some loose metal, a spare bolt, something wrong in the front side. No dice obviously you saw what I saw.
- The spacer that goes on the T10 was not where it belongs and was loose in the cap. The other one was glued in place like it should be.
- This helps keep the cap from being over tightened and also keeps the Hall sensor that is the encoders for the Falcon, aligned and flat with the motor. Without this we would have not gotten accurate encoder data and with this being for a drivetrain that’s killer.
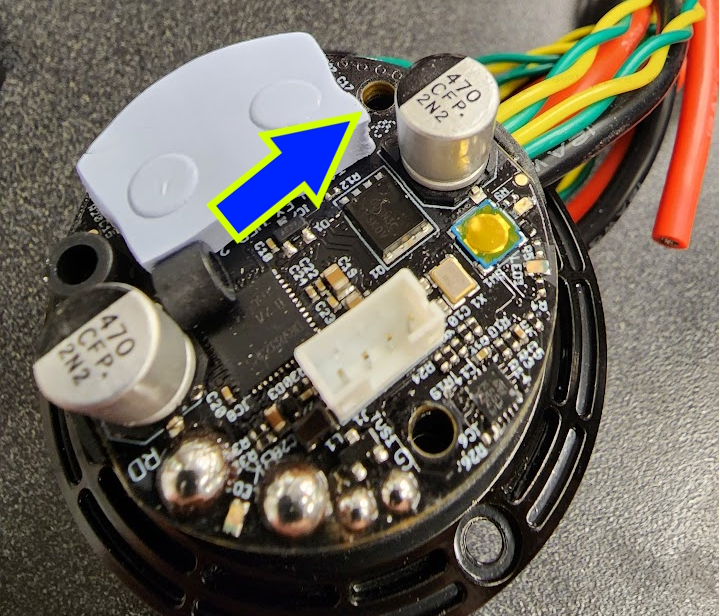
- This helps keep the cap from being over tightened and also keeps the Hall sensor that is the encoders for the Falcon, aligned and flat with the motor. Without this we would have not gotten accurate encoder data and with this being for a drivetrain that’s killer.
- Okay so that’s the end of disassembling a Falcon. Time to put it all back together. For the most part just reverse the steps in the guide.
- Remember how I said before there are 3 slots on the casing? One is solid and the other two look different. If you look at the back plate and the front plate there are matching grooves.
- When putting everything back together make sure to line these slots up properly. It’s the only way it actually goes back together anyways without any gaps.
Other Fixes
Did we miss something?
If you have any other issues that you have found with the Falcon 500, please let us know by adding it to the listings or submitting an issue on our github repo. We will be updating this post as we find more issues and fixes.