2.1.4 Create a Prototype
What is a Prototype?
A prototype is a model of the final product. It is used to test the design and make sure that it works. A prototype is not the final product. While you could use a prototype as the final product, it is not recommended. On the first attempt at building a prototype, you should not use expensive materials. You should use cheap materials that are easy to work with. You should also use materials that are easy to replace. This will allow you to make changes to the prototype without having to worry about wasting expensive materials. You should also use materials that are easy to modify. This will allow you to make changes to the prototype without having to worry about wasting time.
Things to Consider before Building a Prototype
Before you build a prototype, you should consider the following:
- What materials will you use?
- How will you build the prototype?
- How will you test the prototype?
- How will you document the prototype?
- How long will it take to build the prototype?
- How much will it cost to build the prototype?
- What are the critical features of the prototype?
- What are the non-critical features of the prototype?
What if we can’t decide between multiple ideas?
If you have multiple ideas for the design, you could build a prototype for each idea, but this is not recommended. Instead, you should apply some techniques outlined below to help you decide which idea to pursue.
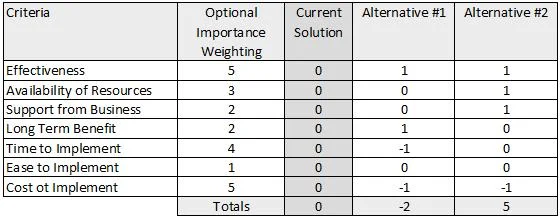
Pugh Matrix
The Pugh Matrix is a technique that allows you to compare multiple ideas. It is a table that has the following columns:
- Criteria - This column lists the criteria that you will use to compare the ideas.
- Idea 1 - This column lists the value for each criteria for Idea 1.
- Idea 2 - This column lists the value for each criteria for Idea 2.
- Idea 3 - This column lists the value for each criteria for Idea 3.
- Total - This column lists the total value for each criteria.
The criteria should be things that are important to the design. For example, if you are designing a robots drivetrain, the criteria could be:
- Cost
- Safety
- Complexity
- Speed
- Effectiveness
The values for each criteria should be numbers. The numbers should be relative to each other. For example, if you are comparing the cost of the drivetrain, you could use the following scale:
- 1 = Very expensive
- 2 = Expensive
- 3 = Average
- 4 = Cheap
- 5 = Very cheap
The total value for each criteria is the sum of the values for each idea. The idea with the highest total value is the idea that you should pursue. You can also apply weights to the criteria. For example, if you think that cost is more important than safety, you could give cost a weight of 2 and safety a weight of 1. This would mean that cost would be worth twice as much as safety.
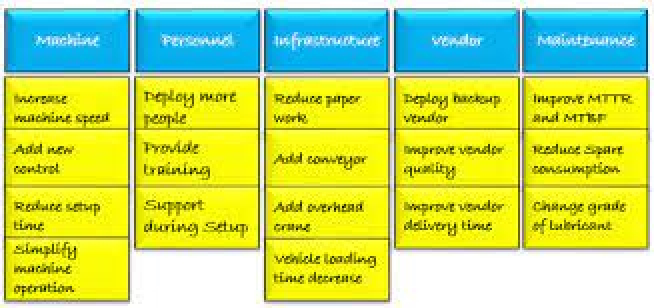
Affinity Diagram
The affinity diagram organizes a large number of ideas into their natural relationships. It is the organized output from a brainstorming session. Use it to generate, organize, and consolidate information related to a product, process, complex issue, or problem. After generating ideas, group them according to their affinity, or similarity. This idea creation method taps a team’s creativity and intuition. It was created in the 1960s by Japanese anthropologist Jiro Kawakita. Source
When should you use an affinity diagram?
- When you have a large number of ideas
- When you want to organize the ideas
- When you want to consolidate the ideas
How do you use an affinity diagram?
- Write down all of the ideas on sticky notes.
- Group the ideas into categories.
- Sort the categories into a hierarchy by some criteria.
- Write down the results and share them with the team.
Now that we have an idea, how do we build a prototype?
There are many ways to build a prototype. You could use a 3D printer, a laser cutter, a CNC machine, or you could use hand tools. You could also use a combination of these tools. The most important thing is that you use the tools that you are comfortable with. You should also use the tools that are available to you. In the early stages of prototyping even wood, cardboard and foam can be used to build a prototype. The important thing is to build a prototype that you can test.
3D Printing
3D printing is a process that uses a 3D model to create a physical object. The 3D model is created using a 3D modeling program. The 3D model is then sent to a 3D printer. The 3D printer uses a nozzle to extrude a thin layer of plastic. The nozzle moves in the X and Y directions to create the layers. The nozzle moves in the Z direction to create the next layer. The 3D printer can create complex shaped pieces that would be difficult to create using other methods. These parts can vary in quality, strength and long term usability. They will speed up the prototyping process and allow you to test your design.
Laser Cutting
Laser cutting is a process that uses a laser to cut a material. The laser is focused into a small beam. The beam is then moved in the X and Y directions to cut the material. The laser can cut a wide variety of materials. These materials include wood, plastic, cardboard, foam, and fabric. The laser can cut very precise shapes. Designs are 2 dimensional and are created using specialized software.
CNC Milling
CNC milling is a process that uses a computer controlled machine to cut a material. CNC mills are usually controlled with G-code. G-code is a series of commands that tell the machine where to move and what to do. The machine is controlled using a computer. The computer sends the G-code to the machine. The machine then moves the cutting tool to the specified location and performs the specified action. CNC mills can cut a wide variety of materials and cutting tools can be changed for different materials or cutting actions. CNC mills can cut very precise shapes. Designs are 2D or 3D and are created using specialized software.
Hand Tools
Hand tools are common, cheap and will work for 99.9% of the projects that you will work on. Hand tools include:
- Saws
- Drills
- Screwdrivers
- Hammers
- Pliers
- Files
- Wrenches
- Clamps
- Vises
- Measuring tools
- Taps and Dies
- Handheld power tools
Most mechanics tool sets, carpentry tools and electrical tools will work for most projects. By following standard building practices, you can build a prototype that will work. Use the table saw to make a base plate, use hand saws to cut down axles and bar stock. Use taps to add threads to a new part, etc, etc, etc. The important thing is to build a prototype that you can test and iterate on.
After creating the prototype, it’s time to test the prototype.